

A guide to mineral polishing
There are as many ways to go about this as there are people in the world, or tools in your workshop. Having had a discussion recently with one of our site sponsors, as well as growing up around people interested in lapidary (The “old guard” I like to think of them as), and spent a good many years running a polishing operation (We’ll leave the detail at that) I thought it’d be fun to go through some of the techniques and methods used, from historic to modern and arcane.
We’re talking about slabs and slices here, not cabachons, or faceted gems, or anything with a rounded surface – The entire focus is on producing a good looking, flat slab to put on a stand in your mineral cabinet, whether it be sugilite, agate, an interesting granite or something more unusual, like rhodochrosite.
The below is a 101 – I’ve probably forgotten things I should include!
History
When I started, many years ago, I’d watch my dad working on a flatlap at a local facility, or using the rock saws, and buffs (the days of silicon carbide and oxides for polishing). He eventually got his own machines, which were, I must say, quite a bit cleaner and didn’t come with contamination issues or “booking slots”!
Studying left me in a hiatus, although sometimes I’d still use dad’s equipment – He’d take out the diamond pacific for “special rocks” and had a number of clever techniques for getting good finishes on just about anything, up to and including beating silicate minerals on belt sanders (yup, it works, if you know what you’re up to).
Eventually, I ended up working in, and then running, a facility with a variety of lapidary tools and machines, both professional and hobbyist. I called dad, often. It turns out there really is sometimes simply a “knack” to things – I’d like to think the experience I had there, and in my formative years, enables me to get a good finish!
The basics
I’m going to assume some things here – You’ve got your slice in hand from the rock saw, with hopefully a reasonably flat surface. If the previous person cut badly and tried to use the diamond blade as a bread knife, you’ll just be spending longer on some of the early steps.
I’m going to assume you know what a flatlap is – if not, look at the image below, of a simple, generic machine.

Generally speaking for aesthetics of the finished product and for success with the following steps you need to achieve flatness – hence, “flatlap”.
There are two ways to go about this – Pictured above, the old school lapidary method, whereby you’re going to use a mix of different suspended compounds called “SiC” – silicon carbide – in different mesh sizes to slowly smooth the surface against a hardened steel lap, or with snap on-snap off diamond laps (they are impregnated with industrial diamond, and usually called “piano” laps, with sizes given in microns). I’ll go through both methods, more or less.
From cutting there is damage to your rock or mineral – Not just the saw marks, but shattering of individual mineral grains caused by the intense friction and local pressure on the sub-millimeter scale, and this will affect how your final product looks (It doesn’t ALL depend on the polish!)
Additionally, at the same time you grind your stone, you’ll be wearing away the lap – Both get “smoothed”, although, obviously, much slower (we hope) for the machine. This means that maintaining flatness is important – you’ll want to move the rock in the shape of a figure eight, or infinity symbol, across the lap, making sure that with each pass you cover the entire surface of the lap and wear the lap evenly, which maintains the flatness and ends you with a flat slice of rock to work with. The flatter the better – Professionally, we would, back in the day, measure flatness using multiple micrometers in a specialized holder!
Contamination is also important. I’m covering off the 101 here, so bear with me before we get into the nitty-gritty below (pun intended) – If you’re working with SiC, every time you change grits (from one size to another, e.g., 80 to 140) you’ll want to totally clean and decontaminate both your rock slice and your machine. This means cleaning, meticulously, and making sure your compounds are also correctly stored. A single grain of 80 grit SiC on your final polishing lap will result in a scratched up specimen, and you’ll be starting from scratch!
The process – Grinding
I’m going to cover off both diamond laps (my preference) and SiC here, it’s going to be a bit of a blend. If you’ve got in-depth questions please do contact us, or post your question on the forum under “lapidary“.
So, we discussed damage. The progressive grinding steps will also induce this, although the depth and extent of surface damage is more prevalent with coarser SiC (and the coarser diamond laps). Keep this in mind – You’ll work longer on the finer laps to achieve results!

Depending on what machine you have, you may have an option for variable speed. I’ve found for a hand-sized specimen (like the sugilite slice, or slightly bigger, pictured below) around 150 RPM (revolutions per minute) is fine all the way to a 600 grit (the diamond laps will be labelled “600 micron”). From 600, I work at around 300 RPM, and up to around 450 RPM in the polishing steps. As a tip, if you find the rock is “sticking”, especially in grinding, add some dish soap. It lubricates the entire process!

You’re aiming for an even coverage of grit on the wheel (not applicable for diamond), with a steady drip of water (get creative, I’ve seen guys use IV bags for this). The consistency of the grit-water mixture will get closer to a sloppy mud the finer you go, however it should be not a paste (thicker than toothpaste) and not too runny. Somewhere between cooking oil and mayo is a good spot.
I usually start quite coarse (80 grit), depending on how badly cut the slice is (sometimes, when purchasing from old mineral collections, it can be really bad) – this step is simply to get the slice more or less even, remove any bad divots and give me a starting surface.
From there your sequence will be something like 120 grit, 250 grit, 350 or 355 (it’s an odd size, you may have to skip this), 450 or 500 grit, 600 grit, 800 grit (only if needed – Hard rocks will require this), 1200 grit and then polishing. Your SiC or diamond snap on laps stop here, for the general purpose.
At 1200 grit, you should have a nice, flat surface with a “matt” finish – No deep gouges, no divots, no big scratches. It’ll look like worn frosted glass – Kinda polished, but not quite. I’ve seen “polished” slices that look worse than the finish you get here, if you’ve had some practice.
Polishing – The tricky part
The old school method is to at this point hold your slice against a “buff wheel” – usually impregnated with tin oxide or aluminum oxide. I don’t like this, and I’ll go into polishing compounds later on. There are a huge variety, from those mentioned above to cerium oxide, poly diamond, mono diamond, mixed diamond.. List goes on.
The point is, you’re now at a “1200” grind and you want to get to a finished product. Leave the buff wheels, please! and, either make several laps you can stick onto your machine (if you’re running SiC) or get the snap-on laps if you’ve followed me into the world of diamond. You’ll want at least five – 12 micron, 9 micron, 6 micron, 3 micron and 1 micron. In some instances you may skip certain steps, depending on what you’re polishing. The process will be the same for all of them, and contamination is absolutely key here, as discussed earlier, so I’m only going to discuss one – Let’s assume we’re at the final, 1 micron finish.
When polishing (and I’m only focusing on diamond here), the compounds are expensive. I suggest mixing a (labelled) dosing bottle, or using a huge syringe – Less is more, and water is your friend. If you keep a steady drip of water onto the lap (not a running stream) for one slice you can usually get away with a “squirt” of 60-40 mixed water and diamond compound per slice, per lap. A little goes a long way!
You’re going to have your speed somewhere you’re comfortable; when polishing the rock slice is prone to “stick” or “jump” when not working on the traditional buff method, preferably above 150 RPM. You’ll work faster as you get more comfortable, and it also depends totally on what exactly you’re polishing.
Same method, following the “infinity” symbol – For the sugilite slice mentioned previously, I stopped on a 1200, and polished with 9 micron, 6 micron, 3 micron and 1 micron, for about 3-5 minutes per step at around 200 RPM. This is applicable to most rocks, although you may polish longer with things like agates and less with soft things (I’ve done ephesite, fluorite, talc.. don’t ask why I was cutting talc, and it was resin impregnated, a discussion for another day).
If you’re more or less following the steps above, you should now have a polished slice!
General, machines and consumables
Geological lab supply companies will sell the diamond laps under the Struers or Metcon brands – the struers ones are referred to as “MD laps”. You can source silicon carbide and diamond compounds from them too, no need to pay the markup to specialist suppliers.
Diamond will generally come in two varieties – Polycrystalline and monocrystalline. This essentially refers to the shape of the grain and what it does to the surface, as well as how long it may take – For general purposes, stick to poly. The brand doesn’t matter, however things like “polycrystalline max” are what to look for. WF, or water free – you don’t need this, you’ll be using water. Don’t pay the premium unless it’s on special.
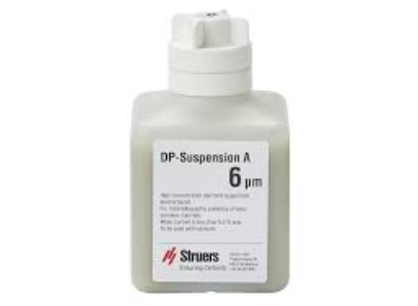
With reference to machines, you can buy old lab flatlaps at a discount, or make your own (I had one made from an inverted floor polisher, a drum and someone’s creative welding that I painted fire engine red). The most important thing is to make sure the lap is flat, have it machined if needed, and doesn’t have a knob or similar in the center.
If you decide to build a machine that can take the diamond laps, I suggest buying the lap first and building the machine around that. They are referred to as magnetic – However, it’s actually the mount (wheel) that is usually magnetic and not the lap – That said, the same place you buy the lap? you can buy a stick-down and trim-to-size magnetic sheet. They aren’t expensive.
In closing..
I’ve used both methods, as well as a glass plate (don’t ask, we won’t go there) to produce stunning polished, well, everything – Fluorite slices down to 2 mm thick (it’s easier not to break stuff on a flatlap), ammonites (my famous “size 12” fossil shoe, below), mantle xenoliths (I have a thing for vibrant olivine!), tourmalines, the usual Kalahari Manganese Fields suite, quartz (yup everyone does that at some point), agates (at a point I did an entire collection of them!) to odd things like chips of pyrite (sometimes you get bored, like I did, about four years ago).
